Getting started
Embedding Luzmo content (a dashboard, a chart or even the complete dashboard editor) in your own application/platform is a simple process, which consists of two main steps:
Generate an Embed token
As a first step, your server-side code makes an API request to retrieve an authorization token of type embed. The result of this request is a key/token combination that will be used to securely embed your Luzmo content in your application/platform.
This first step needs to happen server-side . This is for security reasons: you do not want to expose your API key & token client-side, as that would mean that users would be able to change filters or grant access to your securables (dashboard and/or datasets) themselves. Remember: Never use your API key and token client-side!
The API request is a 'create' request for an authorization . In the snippet below, fill in your API key & token, add the user's details and the resources (collections, dashboards and or datasets) you want to give access to.
Create your API key & token in Luzmo in your profile settings .
import Luzmo from '@luzmo/nodejs-sdk';
const client = new Luzmo({
  api_key: '<your Luzmo API key>',
  api_token: '<your Luzmo API token>',
  host: 'https://api.luzmo.com'
});


const response = await client.create('authorization',
  {
    type: "embed",
    username: "<A unique and immutable identifier for your user>",
    name: "<username>",
    email: "<user_email>",
    suborganization: "<a suborganization name>",
    access: {
      collections: [

        {
          id: "<collection_id>",
          inheritRights: "use"
        }
      ],
      datasets: [

        {
          id: "<dataset_id>",
          rights: "use"
        }
      ],
      dashboards: [

        {
          id: "<dashboard_id>",
          rights: "use"
        }
      ]
    }
  }
);
This returns a JSON object with an id/token combination that we will use in the next step to securely embed the Luzmo content in your application/platform:
{
  "type": "embed",
  "id": "< the embed authorization key >",
  "token": "< the embed authorization token >",
  "user_id": "< a uuid used on Luzmo's end to identify the embed user >"
  // ...
}
For a list of all properties that you can use in the request, check the full Authorization reference in the Core API.
Handling multi-tenant data
Multi-tenancy is the ability of software to serve multiple clients. This means that depending on the client that logs into your platform, the embedded Luzmo content will only contain their relevant data .
There are multiple ways to implement this and Luzmo aims to provide a good solution for each of them. Setting up secure multi-tenancy in Luzmo happens via the Embed tokens and their properties.
Which specific properties are used depends on your data structure. Depending on your current data setup and use case, it might be necessary to dynamically:
apply row-level filtering in case you have one dataset with multi-tenant data
point towards a different data source in case you have one dataset per tenant
More in-depth information about these features and how to implement them in Luzmo can be found in the Handling multi-tenant data section .
Install an Embed library
To embed and display Luzmo content in your webpage, we use the Luzmo Embed Libraries.
First you should install the appropriate component library in your frontend. We have following components available on NPM package manager:
Install the web component via npm package manager by running the following command in your command line interface. It's recommended to use npm to ensure you can easily get the latest version of Luzmo's component when available!
npm i @luzmo/embedIf you're not able to use npm, you can import the minified javascript file in any HTML file using the following code.
<!--
You can (programmatically) retrieve the latest version via this link:
https://cdn.luzmo.com/js/luzmo-embed/latest-version.json
It is recommended to reference a static version in your application (e.g. "<WEB_COMPONENT_VERSION>"),
and periodically verify and upgrade your application's implementation to
benefit from any improvements in the latest version of the web component.
-->
<script
  defer
  src="https://cdn.luzmo.com/js/luzmo-embed/<WEB_COMPONENT_VERSION>/luzmo-embed.min.js"
  charset="utf-8">
</script>
Add the Luzmo component to your HTML page.
<!--
Clients on Luzmo's US multi-tenant application environment,
or a dedicated instance on a specific VPC, should specify:
- appServer="https://app.us.luzmo.com/" (or your VPC-specific address)
- apiHost="https://api.us.luzmo.com/" (or your VPC-specific address)
-->
<luzmo-embed-dashboard
  appServer="< Luzmo App server, defaults to https://app.luzmo.com >"
  apiHost="< Luzmo API server, defaults to https://api.luzmo.com >"
  authKey="< embed authorization key >"
  authToken="< embed authorization token >"
  dashboardId="< dashboard id you want to embed >">
</luzmo-embed-dashboard>
Embed your Luzmo content
Now that you created an Embed token and installed the Embed library, it's time to embed and display your Luzmo content into your application.
The Luzmo Embed libraries expose two components:
Dashboard component (full component reference)
VizItem component (full component reference)
Depending on what you want to embed, jump to one of the following topics:
Retrieving IDs
When creating an Embed token, you need to grant access to dashboards and datasets. To reference these dashboards and datasets, you need their unique ID's. In this section you will learn how you can find those ID's in our user interface for various entities.
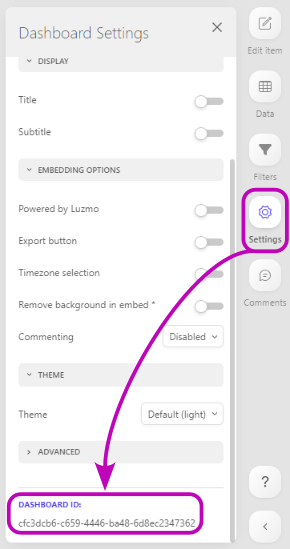
Retrieving a dashboard id
The dashboard id is a unique identifier for that dashboard.
You can retrieve the id of a dashboard in the 'settings' tab of the dashboard editor, on the right hand side of the screen. At the bottom of the tab, you will find the dashboard id.
You can also dynamically retrieve accessible dashboards in your frontend using the getAccessibleDashboards method of the Luzmo frontend component!
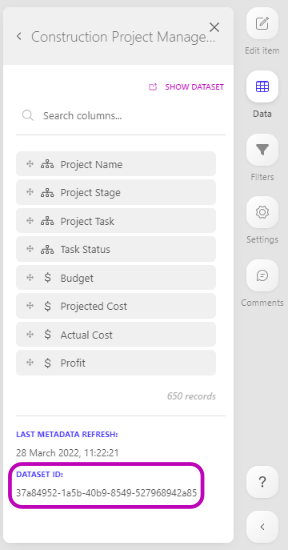
Retrieving a dataset id
The dataset id is a unique identifier for that dataset.
You can retrieve the id of a dataset in the 'data' tab of the dashboard editor, on the right hand side of the screen. At the bottom of the tab, you will find the dataset id.
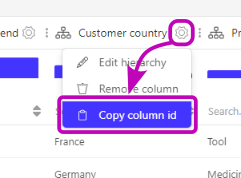
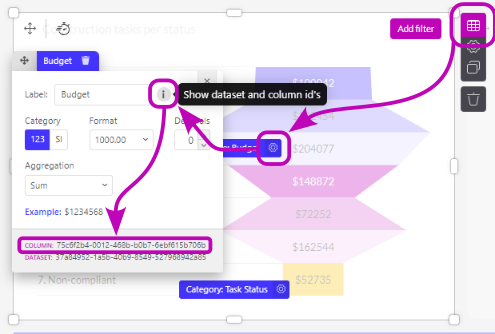
Retrieving a column id
The column id is a unique identifier for that column.
You can retrieve the id of a dataset column in the dataset preview board by clicking on the gear wheel next to the column name.
Secondly, you can also retrieve the Column ID from a widget, by hovering over the widget and clicking the table icon that appears next to it. You will now see an overview of all slots (columns) used in this chart. Click the gear icon next to the slot you want to know the id of, and then click the grey info circle. At the bottom of the modal, you can find the column ID. Additionally, you can also find the dataset ID here.
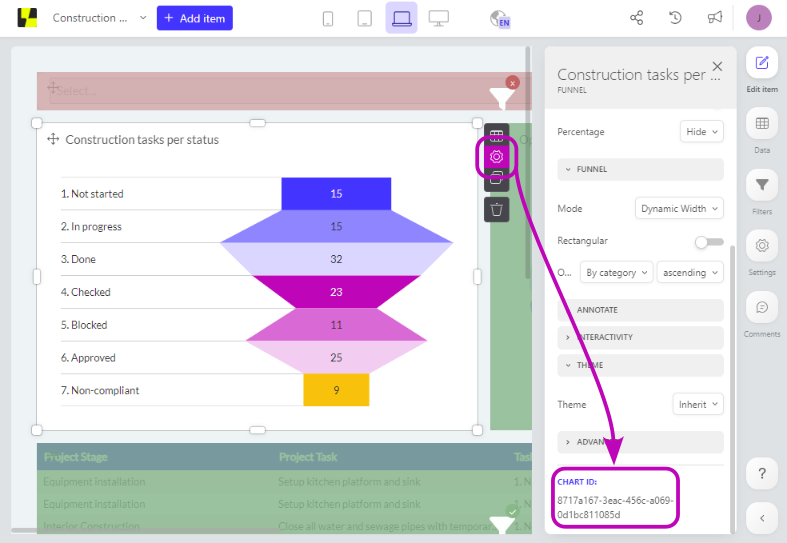
Retrieving a chart id
The chart id is a unique identifier for that chart.
You can retrieve the id of a chart by hovering over the chart and clicking the gear icon that appears next to it. By doing this you will enter the item settings. At the bottom of the tab, you will find the chart id.
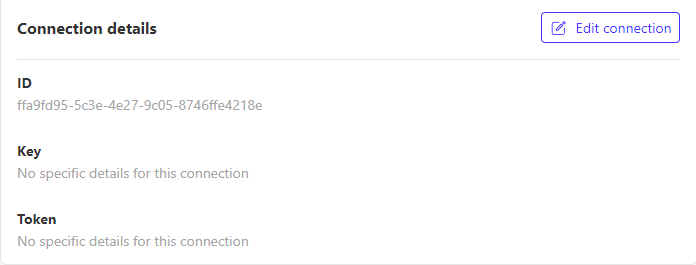
Retrieving a connection id
The connection id is a unique identifier for that connection. A connection contains the information that is necessary to access a certain plugin or database.
You can retrieve the id of an connection in the Connections tab of the side menu.
Retrieving a collection id
The collection id is a unique identifier for the collection. You can retrieve the uuid of a collection from the URL when selecting a collection in our UI.
